

I started meal prepping in college when I got tired of setting aside time each night to plan and make whatever I was going to eat the next day for lunch. Some days “making lunch” would consist of cutting up carrot sticks, putting some hummus in a container and grabbing a protein bar because I was too exhausted and crunched for time to do anything more creative. Meal prepping for me, started out as a way to stay in my corner of safe foods, while eliminating any worry or fear that might come from a spontaneous lunch date with a friend, being rushed into a decision at a restaurant and obsessing over each ingredient in the dish I ordered, and having to pay for the consequences later by way of excessive exercise, laxatives, and hateful self talk.
Today, I meal prep for much different reasons, some of which include:
- Convenience – I don’t have to go anywhere to pick up food, or think about what I want to eat. Instead, my breakfast and lunch are all ready to go and only require removing a lid off of the container and heating it up in the microwave (if it is a hot dish).
- Time – I can now use my mornings, lunch breaks, and evenings to do other stuff I need to get done. Some days this means resting, while other days it means running errands, replying to emails, working on my book, reading, praying, or journaling.
- Nutrition – Although I no longer live under the wrath of disordered eating, I do still care about the ingredients I put into my body and get excited when I’m able to put meals together at the beginning of the week that are both delicious and good for me!
- Money – Eating out every day of the week can get expensive and I’m not trying to spend all of my hard earned cash on (most of the time) simple meals I could easily prepare in my own kitchen.
Now, I do want to assure you that I have skipped meal prepping some weeks due to life (it can get quite busy as I’m sure you know) and laziness. When I think about chopping up a bunch of produce, standing over the stove for an hour, and having a giant mess to clean up afterward—on my weekend—meal prepping sounds terrible. This is why I’ve put together my top tips for making meal prepping more accessible. I believe with these tips and few hacks of your own, you too will find meal prepping a source of added convenience, productivity, nutrition, and money.
My top tips for successfully meal prepping:
1. Wash and cut all of your produce before your chosen day to meal prep
This is by far, the best tip I could offer you. It’s taken my meal prep game to a whole new level! I’ve found that if I’m able to do my least favorite part of meal prepping, which is washing and cutting all the produce I decide to buy and use, the process of cooking goes much smoother. Washing and cutting my produce beforehand allows me to focus more on cooking methods, oils, spices, and combinations of ingredients or flavors. For this reason, I would advise you not to grocery shop and meal prep the same day. That’s half of your Sunday right there. Instead, break the process up into more approachable steps to lighten your load.
2. Before going to the store, look at what you already have and only buy ingredients that are going to help make a full meal
I rarely follow a recipe when I meal prep and instead, make up my own as I go. More often than not, I haven’t had time to think about what I’m going to meal prep until I’m in the store, browsing the aisle and grabbing a few staples I know are versatile and easy to make a meal with. I do always seem to have a pretty good idea of what’s in my cupboards and fridge at home, which makes grocery shopping on a whim much easier. I also like to buy items that are on sale because uh, hello—I’m a fresh college gradate. For instance, in the recipe following this post, you will notice I used Banza chickpea pasta and spinach—both of which I bought on sale at the store the week prior and had leftover. This made throwing together a pasta dish extremely simple.
If you don’t live alone like I do, keeping track of what’s in your cupboards and fridge might not be as easy, which is why I suggest taking a quick peak before you head off to the store to buy groceries. This could quite possibly be a creative outlet (or stressful event depending on your personality) to throw together a meal with a product or two that you already have.
If you prefer to have a simple recipe to follow, here are a couple I have used in the past and would suggest using:
- Chicken and butternut squash harvest bowls
- Wild rice and edamame salad
- African squash and peanut stew with coconut milk and quinoa : I used kale instead of spinach, jasmine rice instead of quinoa, and skipped out on the fresh peanuts.
3. Choose simple dishes with a more limited ingredient list
It’s easy when you first start meal prepping, to get overly excited with all the fun and creative recipes out there, but choosing a recipe with a more limited ingredient list is not only going to make your job easier and less overwhelming, but its going to save you both money and time in the end. This doesn’t mean you can’t be creative, but it might mean subtracting or substituting a couple of the ingredients you don’t have, or skipping a couple of the steps that aren’t absolutely necessary.
4. Ask yourself, what sounds good to me this week and what will I enjoy eating the next 4-5 days?
Unless you’re a creature of habit, don’t meal prep the same thing every week. And even if you are a creature of habit, I’d still steer you away from doing so. It’s okay to have a go-to meal prep, but at the very least change up at least a couple of the ingridients. My reason being, very few people like eating the same thing every. single. day. Eventually it gets old and mundane. To keep yourself from feeling unsatisfied, bored, or more likely not to eat your meal prep, I suggest getting curious about the things you’ve been craving or wanting to try. This doesn’t have to be complicated, but brainstorming what you might meal prep should be fun! I also recommend staying under 5 meals for breakfast and lunch. After that, things can get real iffy and will possibly smell weird, while also losing texture, flavor, and micronutrient content.
5. Meal prep your breakfast dishes earlier in the day and your lunch dishes later in the day (if you plan to make both)
It reached a point where making my breakfast and lunch dishes all at the same time, became too much. I’m a perfectionist and don’t exactly have the gift of multitasking, which means I often would forget what I was doing for one set of dishes due to my intense focus on a task I was completing for the other dishes. To avoid this, I started separating the time I made my weekly breakfasts, from the time I made my weekly lunches. I’ve found it’s best to do this when I’m already going to have a mess to clean up or dishes to do. For example, after breakfast or lunch of my chosen meal prep day.
I prefer to wait until the evening to make my lunch dishes, close to when I plan to have dinner. This way, I can simply make one extra dish for my dinner that evening, while at the same time filling 4-5 additional containers for my lunch the upcoming week. Now, again, I live alone and this seems to make the most sense for me. If you have a larger family, you may need to be prepared to make a few extra dishes, or plan to do your meal prep before or after dinner time. You may find you prefer to do all your meal prep at the same time. If so, disregard this tip. There is no right way to meal prep, just whatever makes sense for your lifestyle.
6. Don’t be afraid of rice and beans…they are actually quite good
Like I said before, keeping up your meal prep game when life gets busy is hard! Some weeks, finding the time or energy seems impossible and that is a-okay. All I would say in response to this is, keep it simple…and I mean even simpler than a recipe with a limited ingredient list. I’m talking rice and beans simple, and MAYBE a little bit of onion or tomato if you’re feeling fancy. It turns out, there’s actually quite a bit you can do with rice, beans, and just a few spices. It’s cheap, it’s tasty, and it’s EASY. To make it even easier, I’ll sometimes buy the pre-cooked rice that only requires 90 sec in the microwave. Throw a couple packages of that in a bowl with a medley of beans and VIOLA, you have lunch! I love throwing some avocado and hot sauce on top too, but that’s just me.
7. Make meal prepping a part of your schedule
Achieving goals is hard when you don’t have a plan. This is why months, sometimes years go by, before people are able to incorporate something like exercise, reading, or meditation into their daily rhythm. This is also why most New Year’s Resolutions fail. Read the book The Power of Habit for more on habit change. My point is, by pre-committing to meal prepping and setting aside time in your schedule, you’re setting yourself up for success. Again, life happens and this doesn’t mean you won’t have weeks where meal prepping is impossible. However, knowing you’ve already put the time on your calendar will make it less tempting to fill that time with other things that come up. With time, it will become less an if it happens, it happens sort of deal, and more a programmed part of your routine.
I hope you’ve found these tips helpful and are inspired to try meal prepping out for yourself. I’m telling you…it’s changed my life and I have faith it will change yours too with a little patience and dedication. If you’re already a meal prepper, I’d love to hear any additional tips you’ve found helpful in the comments below.
2 meal prep recipes just for you
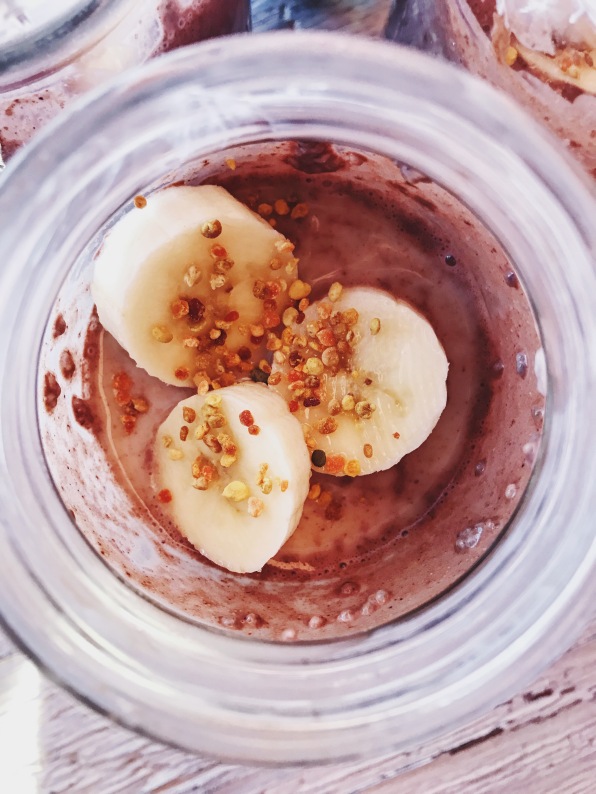
Now, as promised, I have two easy peasy lemon squeezy recipes for you! The first one is a blueberry cinnamon chia pudding—one of my favorites. From the plant Salvia hispanica, chia seeds are known for delivering long lasting energy. Chai is the ancient Mayan word for “strength” and long ago, chia seeds were commonly consumed by Aztecs and Mayans. Chia seeds are low in calories and packed with fiber, protein, antioxidants, omega-3 fatty acids, manganese, magnesium, phosphorus, calcium, zinc, vitamin B3, Vitamin B1, Vitamin B2, and potassium.
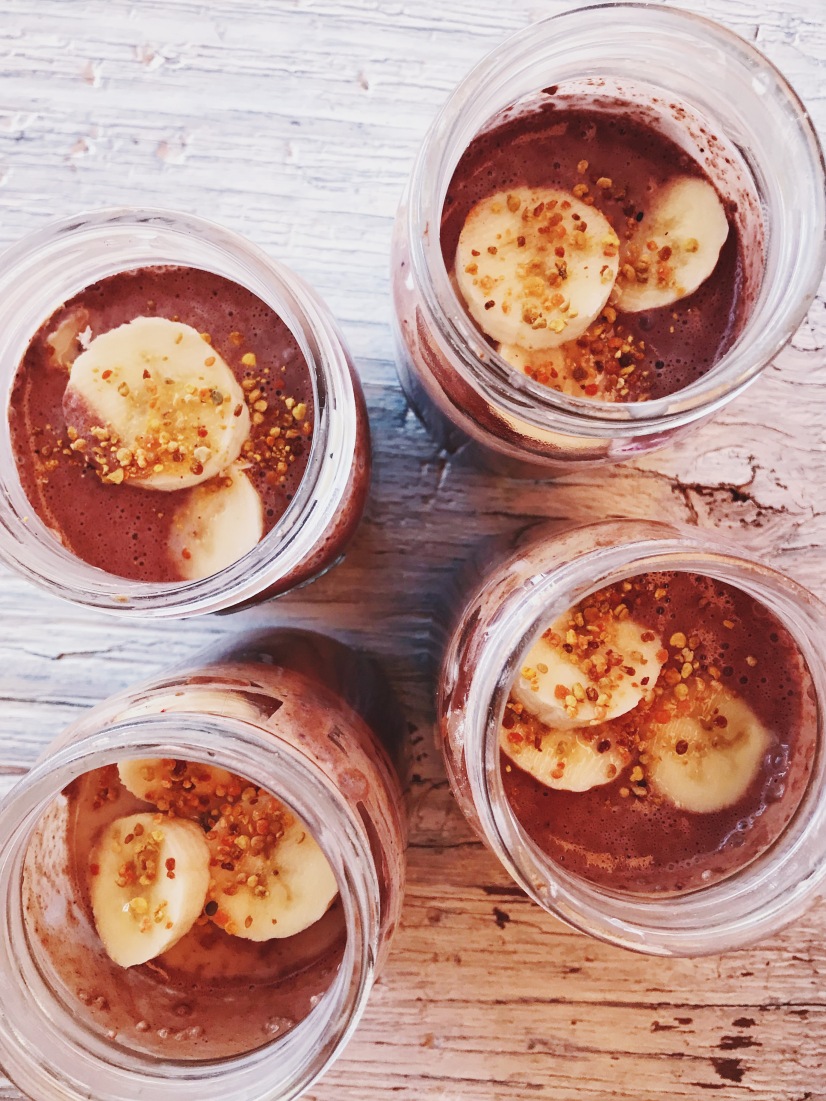
These puddings are easy to put together and after you taste just one bite, I just know you will be happy with your decision to have set aside 20-30 minutes to make them. All you have to do is place all of the ingredients into a jar, stir em’ around, and place them in the fridge. I think back to the days I skipped breakfast or had nothing more than a bland granola bar. Now, breakfast is my favorite meal of the day and it’s recipes like this that bring me so so so much joy and make me feel as if I’m having small bites of heaven right out of the jar.

Blueberry Cinnamon Chia Pudding
Servings: 1 Prep time: 5 min Total time: 5 min
 Ingredients
- 2-3 tablespoons of chia seeds
- 1/4 cup plain Greek yogurt
- 1/2 cup frozen or fresh blueberries
- 1/2 cup unsweetened vanilla almond milk
- 1 tbsp maple syrup or substitute
- 2 tsp cacoa
- 1 tsp maca
- 1/2 tsp cinnamon
- 1/4 tsp vanilla
Directions
- Place all ingredients from top of the list to the bottom, in a jar or reusable container.
- Stir vigorously with a butter knife until there are no chia seeds, powder, or cinnamon stuck to the bottom or sides. I’ve found a butter knife to be the best tool for getting everything mixed together quickest, and leaving the most goodies in the jar.
- Top with your favorites! I did a couple banana slices and sprinkled bee pollen. Other toppings you might try are shredded coconut, cacoa nibs, or granola.
- Place a lid on top of your jar or container and store in the fridge for at least 3 hours before consuming.
Note:
-The easiest way to meal prep these puddings is to take each ingredient, and put the specified amount in each of your containers one after the other.
-I substituted maple syrup for a monkfruit based maple syrup I found at Grocery Outlet. You can also use honey, agave, or coconut sugar for a different kind of sweetness.
-If using granola as a topping, wait to put it on top until right before eating to prevent sogginess.
-Your chai pudding really won’t go bad, unless your yogurt is close to its expiration date or your blueberries are fresh and overly soft. For this reason, I recommend keeping your chai pudding no longer than 5-7 days.
Recipe 2
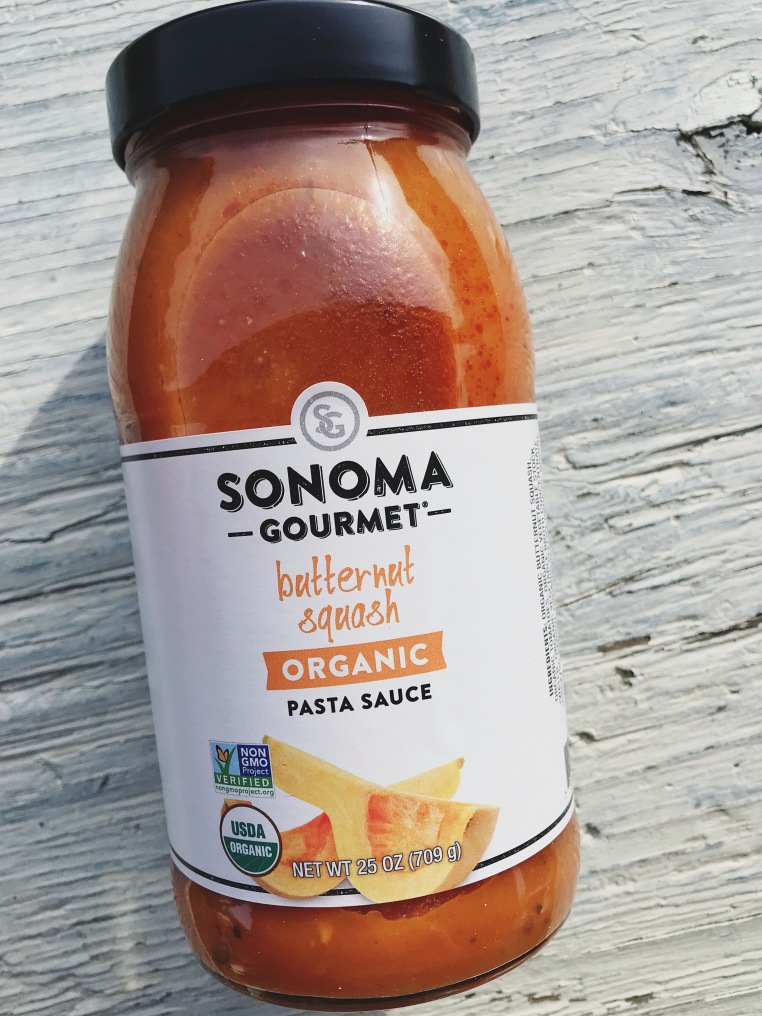
The second recipe I have for you is a fall inspired pasta dish. As I said earlier, I rarely go to the store with a plan of what I’m going to meal prep. I used to, but I’ve been doing it long enough now and have a pretty sound process that works for me. So, as I was browsing through Grocery Outlet one afternoon—buying way too many discount items I didn’t intend to buy—I came across a yummy butternut squash pasta sauce both low in sugar and organic. It was basically calling out to me, “Pick me, Carly! I’d go great with your chickpea pasta.” That’s when I yet again, caved in my favorite discount store, put the sauce in my cart, and decided to put together this simple pasta as a Welcome November meal prep.
If you haven’t ever tried Banza’s chickpea pasta, you’re in for a treat! This is by far the best pasta alternative I’ve tried and now, I prefer it over regular pasta—say whatttt? That’s right. This stuff not only has an admirable texture, but is FILLED with protein and fiber. When it comes to regular pasta, it takes a lot for me to get full because it’s main nutrient is carbs (which are omg delicious…but not always satisfying by themselves). This pasta still has carbs, but I think you will find it to be much more satisfying after just a few bites. Enjoy!

Falling For You Veggie Pasta
Servings: 7 Prep time: 20 min Total time: 40 min

- 2 boxes Banza pasta or substitute
- 2 tbsp of olive oil
- 1 medium red onion, chopped
- 2 cloves garlic, minced
- 1 1/2 cup of cremini mushrooms, sliced
- 2 small zucchini, sliced
- 1 jar of pasta sauce, 25 ounces (store bought or homemade)
- 1 can of tomato sauce, 8 ounces
- Desired amount of spinach (I did 4-5 cups)
- Basil
- Paprika
- Cumin
- Cayenne
- Salt
- Pepper
Directions
- Begin sautéing onion and garlic in a large pan with olive oil. I used my wok pan. Just keep in mind, all of the ingredients will eventually end up in this pan.
- After about 4 min, add in the zucchini and mushroom and sauté for another 5-6 minutes until veggies are soft, browned, and to your liking.
- Once pasta is finishing cooking and strained, set to the side and add pasta sauce, tomato sauce, and spinach into the pan.
- Next, add your desired amount of basil, paprika, cumin, cayenne, salt, and pepper.
- Let simmer for 7 minutes.
- Add in the cooked pasta, turn off burner, and stir all ingredients together.
- Place in reusable containers and let cool for about 30 min with the lid off before placing in the refrigerator.
Note:
– Don’t have every spice listed? No sweat! Use the ones you do have and like, and if there’s another spice you think would pair well, go ahead and add that in too!
-Other veggies you might substitute or add to this dish are squash, broccoli, bell pepper, olives, artichoke, or sun-dried tomatoes.
– I had enough pasta for 7 containers and knew I wouldn’t eat all 7 in one week. If you have leftovers too, you can store a few containers in the freezer to have on hand for busy days or the following week’s prep.